How to make a French knot: diagram, sizing, and troubleshooting

To make a French knot, bring your threaded needle to the front, wrap the floss around it twice, then insert the point just beside the starting hole. Snug the wraps against the fabric and pull through slowly while holding the working thread gently taut. The wraps form a small raised knot. This tutorial uses two wraps; follow your pattern if it specifies otherwise.
A French knot can look fine around the needle, then turn into a loose loop as you pull through. Before adding another wrap, check your holding hand. Letting the thread go slack can undo the shape you just made.
This guide is for cross-stitch beginners meeting their first French knot symbol, or anyone who wants a closer look at the movement. Read the whole sequence once before picking up your needle.
Jump to the instructions · Needles and supplies · Knot sizes · Troubleshooting · History
What is a French knot?
A French knot is a raised embroidery stitch made by wrapping thread around a needle, then drawing the needle through to leave a small dot.
Use individual knots for flower centers or tiny eyes, or cluster them to fill a shape with texture. They can sit among cross stitches even though they are not X-shaped stitches themselves. For a first experiment, I would add a few spaced dots around a stitched initial rather than fill a whole area.
What do you need for a French knot?
You need embroidery floss, a threaded needle, scissors, and fabric held steady. A hoop helps you manage the thread while you draw the needle through.
For practice, choose a scrap of fabric and floss that contrasts with it. Start with two strands of stranded cotton, unless your pattern asks for a different number. Thread them through the eye together, leaving a short loose tail rather than folding them into four strands.
Which needle should you choose?
A regular embroidery needle works. If its eye keeps catching inside the wraps, try a milliner's needle: its eye is about the same width as its shaft, so it passes through more easily. Mary Corbet explains both options in her French knot video tutorial.
The blunt tapestry needle you use for cross stitch is designed to pass through existing fabric holes. A sharp embroidery or milliner's needle gives you more control when the return point needs to pierce the fabric beside a hole. Choose a size that takes your thread comfortably without forcing it through the eye. See Corbet's guide to embroidery needle types.
How many strands should you thread?
Two strands are a useful starting point for this exercise, not a requirement for every French knot. Use your pattern's specified count on an actual project.
Strands and wraps are different. Two strands means two lengths of floss travel through the stitch together. Two wraps means that bundle goes around the needle twice. You can change one without changing the other.
Set up the fabric
Keep your fabric comfortably taut in a hoop and support it so you can control the thread with your free hand. Choose a short, manageable working length for practice; a long length gives you more thread to pull through each knot.
Secure the starting end on the back before you begin. On an existing project, you can weave it under nearby stitches. For a practice scrap, a small starting knot is fine.
How do you make a French knot?
Bring the floss up, wrap the needle twice, and return beside the starting point. Hold the wraps at the surface while drawing the needle through.
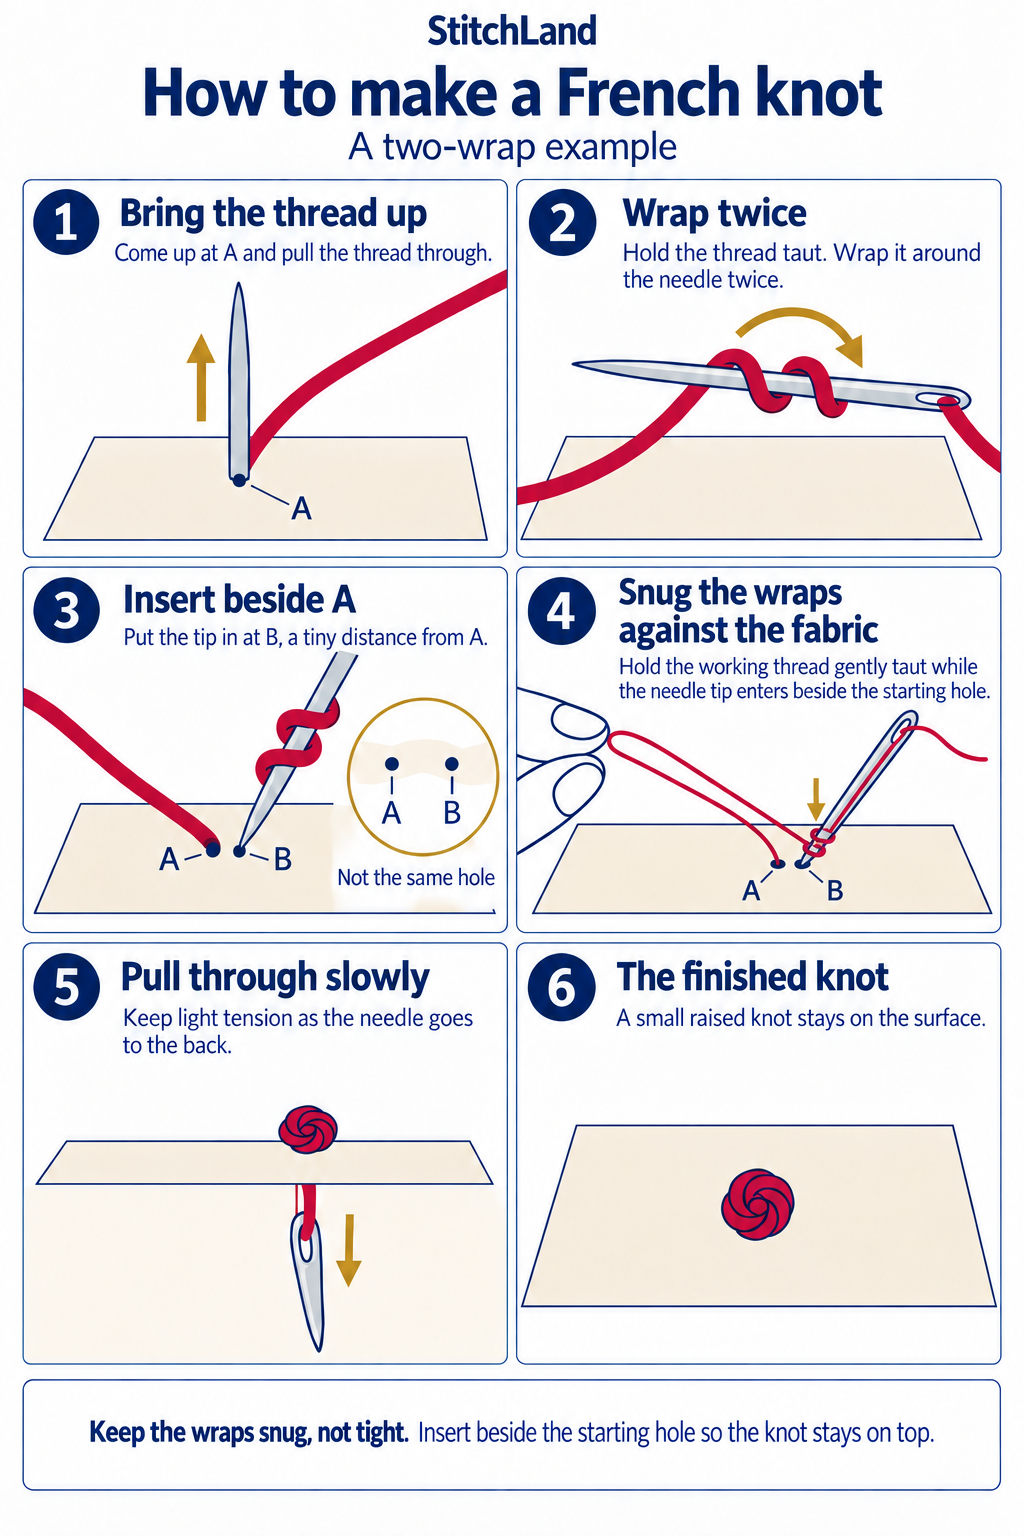
A is where the thread comes up; B is where the needle goes down. The drawing enlarges the spacing for clarity. Step 5 shows the end of the pull-through, with the needle below the fabric.
1. Bring the thread up
Bring the needle from back to front at A. Pull the working length through, then hold the thread to the side with your free hand.
2. Wrap twice
Keep the needle steady and wind the working thread around its shaft twice. Keep both wraps in the same direction. Hold them close together without cinching them so tightly that the needle cannot move.
3. Insert beside A
Place the needle tip at B, immediately beside A rather than in the same opening. Leave a little fabric between the entry and exit points to support the knot.
4. Snug the wraps against the fabric
With the needle tip just through the fabric, gently draw the held thread sideways. The wraps should move down the shaft to the surface. Pause here before pulling the needle all the way through.
5. Pull through slowly
Draw the needle to the back while your other hand keeps light tension on the thread above. As the remaining loop shrinks, let it slide through your fingers. Release it near the end and finish pulling gently.
6. Check the finished knot
The knot should sit on the front without a loose loop above it. Secure the thread on the back when you finish stitching.
Mary Corbet's French knot tutorial also shows the movement in video. Two wraps are the example used here, not a rule for every design.
How do you get different French knot sizes?
Change the strand count or thread thickness to adjust knot size. Keep your wraps consistent at first so you can compare the results fairly.
Try these three samples on the same scrap of fabric. Compare their size and shape rather than expecting a particular diameter. Your needle and tension affect the result too.
| Sample | Strands | Wraps | What to compare |
|---|---|---|---|
| A | 1 | 2 | A finer dot than the two-strand sample |
| B | 2 | 2 | Your reference knot for this tutorial |
| C | 3 | 2 | A fuller knot with the same wrap count |
I would compare those three before adding extra wraps. Mary Corbet describes changing thread weight as a reliable way to make French knots larger or smaller. She also shows how needle size and tension affect their appearance.
What changes when you add wraps?
One wrap can make a more delicate knot; two is the example in our diagram. Adding more wraps is not the same as using more strands. A growing stack of wraps becomes harder to control and may look loose or elongated rather than like the rounded dot you wanted.
Keep the strand count fixed if you compare one wrap with two. That way you can see which change caused the difference. Follow the designer's instructions if you are matching knots across a chart.
Does the thread type matter?
Yes. Stranded cotton lets you adjust the number of strands. Pearl cotton is a twisted thread that you use whole rather than separate, so choose a different thickness when you want to change its bulk. The two products are not interchangeable strand for strand. Mary Corbet's cotton thread comparison explains their construction.
Why is my French knot loose or disappearing?
A disappearing knot often means you reused the starting hole. Loose loops suggest lost tension; a stuck needle can mean the wraps are too tight.
| What you see | What to check next |
|---|---|
| The knot pulls to the back | Move the insertion point slightly beside the starting hole, leaving fabric between them. |
| A loose loop sits above the fabric | Keep holding the working thread as the needle passes through. Release near the end. |
| The needle catches inside the knot | Ease your grip a little. If the eye still catches, try a milliner's needle. |
| The knot forms away from the surface | Settle the wraps at the fabric before drawing the needle through. |
| The thread tangles before it finishes passing through | Stop pulling. Ease any loose tangle apart before it tightens, then resume slowly while controlling the working thread. |
| The knots vary in size | Check that you kept the strand count, wrap count, needle, and tension consistent. |
If the movement feels rushed, I suggest pausing at step 4. Put the needle tip in and check that the wraps have reached the fabric before you pull through. You can take your time here.
Mary Corbet's French knot troubleshooting tips explain why even tension and a slow pull help keep the knot in place.
How do you stitch French knots on Aida?
On Aida, bring the thread up at the charted position, then go down immediately beside it, catching fabric rather than reusing the same open hole.
A sharp embroidery needle can help you place that second insertion between the woven threads beside the opening. You do not need to move a whole cross-stitch square away. Keep the gap small enough that the knot covers it.
Check the pattern key for strand and wrap counts before changing either. A tiny eye and a large flower center may need different knots. Caterpillar Cross Stitch's guide also covers placing French knots on Aida.
On linen, evenweave, or plain woven cotton, the same stitch sequence applies. Pick a return point close to the exit with enough fabric between them to hold the knot. Aida's visible grid can make it tempting to treat every insertion as a full-square move, but the knot does not need that spacing.
A brief history of French knots
French knots appear in surviving medieval embroidery. That documents their use centuries ago, but it does not establish who invented them or where they originated.
The Royal School of Needlework identifies French knots on the Butler-Bowdon cope, a medieval ceremonial garment. The V&A dates the cope to 1330-1350 and identifies its embroidery as English. This is a documented example, not a claim that the stitch began in England. RSN StitchBank, V&A: the Butler-Bowdon cope.
RSN also records French knots in seventeenth-century Jacobean crewelwork and raised embroidery, including depictions of foliage and hair. Their use extends well beyond modern cross-stitch charts.
The sources linked here do not explain when the name "French knot" arose. I would not treat the name as proof of a French invention.
French knot questions
Strand count changes the bulk of a French knot; wrap count changes its formation. Follow the pattern first, then test adjustments on spare fabric.
Should I use one wrap or two?
Either can work. This diagram uses two. For a comparison, make one knot with a single wrap and another with two, keeping the thread and fabric the same.
Can I make a French knot left-handed?
Yes. Hold the needle in your left hand and control the working thread with your right. Keep each knot's wraps in one consistent direction. The same close insertion and steady tension apply.
Is a French knot the knot used to start my thread?
No. A French knot is a visible decorative stitch on the front. Securing your starting thread on the back is a separate job.
Try a small practice row
Make five knots on spare fabric using the same thread and wrap count. Compare where they sit before changing anything about your next row.
For this first row, I care more about the knots staying on the surface than matching in size. If one goes wrong, note which step felt different and try that part again on the next knot.
For the other stitches in your pattern, see StitchLand's cross-stitch techniques guide. Or use the alphabet generator to chart a small initial and practise a few decorative knots around it.